
The builder tells you how well every image will print, at the size you have placed it, before you order. It draws a coloured outline around each one and shows the exact resolution in the panel beside it. This covers how to read that and how to get close enough to see the detail.
Read the Resolution Outline
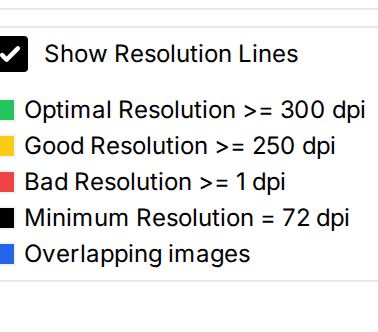
With Show Resolution Lines on — it is on by default — every raster image on your sheet carries a coloured outline:
| Outline | Means |
|---|---|
| Green | Optimal resolution. Prints cleanly. |
| Yellow | Good resolution. Acceptable for most work. |
| Red | Below the shop's good threshold. Expect visible softness. |
| Black | Terrible resolution, or below the shop's hard minimum. |
| Blue | This image overlaps another one. Overlap outlines override the quality colour. |
The dpi figures behind those colours are set by each shop, because a shop printing bold graphics and one printing photographs do not agree on what counts as enough. Out of the box they are 300 dpi for green, 250 for yellow, 200 for red, and a hard floor of 72. Select any image and the panel at the top-left of the canvas lists the actual numbers your shop uses, along with the colour key.
Text and vector artwork have no resolution to measure, so they are always outlined green. The colour only means something on uploaded photos and raster images.
The outline reflects the size you have placed the image at, not the file you uploaded. Drag an image bigger and a green outline can turn yellow or red. That is the point of it.
Check the Exact Numbers
Click any image. The information panel at the top-left of the canvas shows its Left, Top, Width, Height and Resolution in dpi. The resolution shown is the lower of the horizontal and vertical figures, which is the one that will let you down.
Zoom In to Inspect Detail
The zoom controls sit at the top-right of the canvas.
- Click the magnifier-plus and magnifier-minus buttons to step in and out. Each click changes the zoom by ten percent, and the current level is shown between them.
- Hold Ctrl and scroll the mouse wheel to zoom towards the pointer. This is faster than the buttons when you know where you want to look.
- Scroll the wheel on its own to move up and down the sheet, and use the sliders at the edge of the canvas to move across it.
- On a touchscreen, pinch with two fingers to zoom.
- Click the fit-to-screen icon to bring the whole sheet back into view, or 100% to return to actual size.
Zoom past 100% on any image you are unsure about. Below 100% the browser is shrinking the image to fit your screen, which hides softness that the printer will not.
If an Image Is Too Low Resolution
The simplest fix is to make it smaller on the sheet. Resolution is dots per inch, so the same file spread over fewer inches has more dots in each one — dragging a red image down a size or two often takes it to yellow or green.
If it needs to stay that size, replace it with a larger original. Scaling up in the builder does not add detail, and some shops block it outright: if you see "To ensure image quality, you can't upscale this image any further", you have hit the shop's floor.
About the Checkout Preview
The preview shown at checkout is a compressed, screen-sized rendering of your sheet, not the print file. It commonly looks softer than the result.
Trust the outline, not the preview. An image that was outlined green in the editor will print at the resolution the outline claimed, however the preview renders in your browser. If you want to look again, go back to the editor and check the outline colour there.
At Checkout
When you save and add the sheet to your cart, the builder runs a final Quality Check listing:
- No overlapping images.
- No low-resolution images.
- No items overlapping the artboard.
- No semi transparent pixels detected. (Only if the shop has the transparency warning on.)
Anything that fails is shown in red. You can still proceed by ticking Print Anyway, but you are accepting the result — this is the last point at which the problem is cheap to fix.